
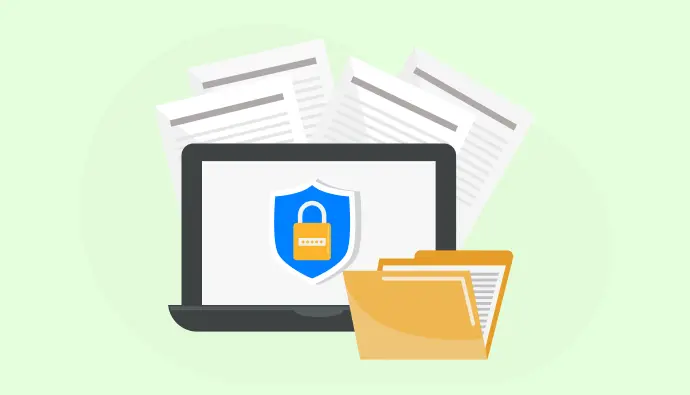
You don’t want anyone accessing, copying, or altering your documents without permission. And you’re probably wondering how to protect a document effectively.
Is password-protecting a document enough? Not really. Studies show that weak passwords contribute to 80% of data breaches in organizations.
So, what methods should you use to protect your documents, and how do you do it right? If that’s on your mind, you’re in the right place.
In this blog, we’ll explore the risks your documents face, the best ways to safeguard them, and practical tips to avoid common security mistakes.
Let’s get started!
A. Understanding document vulnerabilities
To choose the right way to protect a document, you first need to know what you’re protecting it from. Understanding these vulnerabilities helps you apply the right security measures effectively and avoid potential risks.
1. Unauthorized access
Unauthorized access is where someone gets access to a document without the owner’s consent. And it’s not necessarily an outside hacker, it can also occur internally within an organization when an employee views files they shouldn’t.
If your information isn’t adequately safeguarded, sensitive data can quickly find itself in the wrong hands and result in privacy violations or even legal repercussions.
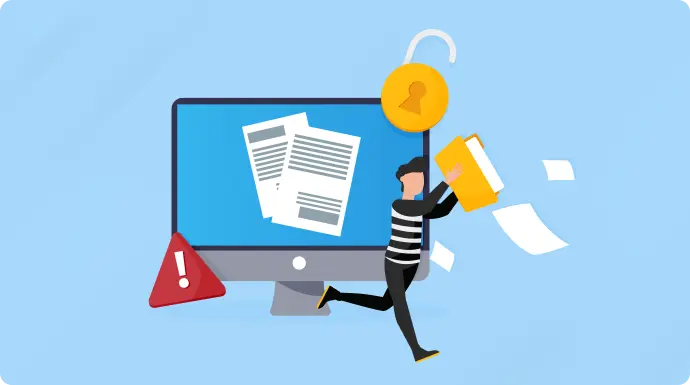
2. Data theft
Cyberattacks like hacking, phishing, and malware can compromise entire systems, leading to stolen or leaked data.
Opening a phishing email, visiting an unsecured network, or leaving a document unsecured can reveal sensitive information.
Attackers don’t just steal data, they can encrypt files for ransom (ransomware) or tamper with stolen data to disrupt business processes. Once lost, restoration can be expensive or even impossible.
3. Tampering and forgery
If unauthorized individuals gain access to a document, they can manipulate its content for personal or financial gain. And it doesn’t have to be a classified document, even ordinary files can be exploited.
For example, imagine someone getting hold of an official donation request letter from a well-known charity. They edit the bank details, make copies, and send them out, tricking people into donating to the wrong account.
4. Accidental loss or corruption
Not all document protection threats come from attackers. At times, it is a mere human mistake or system failure.
A misplaced device, unintentional file deletion, or a failed backup can result in irreversible data loss. Malware infections and system crashes can also make files unreadable or unusable.
B. How to protect a document with ease
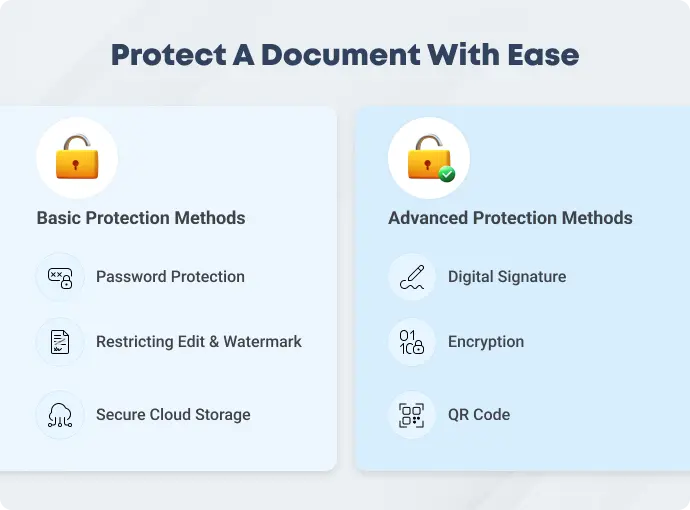
Protecting a document isn’t just about adding a password and hoping for the best. Various protection methods counter various threats, and the appropriate strategy will depend on the nature of the document, its sensitivity, and how it is being used or shared.
Let’s walk through both basic and advanced protection methods.
1. Basic protection methods
These methods offer fundamental security for everyday documents. While they may not withstand sophisticated attacks, they add a necessary layer of protection.
Basic protection methods are best suited for documents used in daily operations, and files that employees rely on to perform their tasks.
a. Password protection
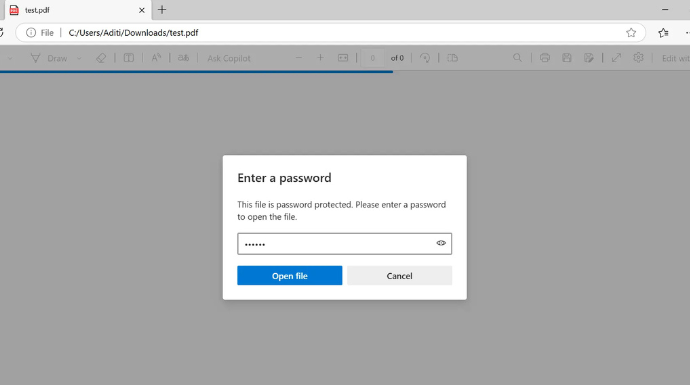
Password protection adds a virtual wall when opening a document, making sure only people with the right credentials can access the document.
However, weak passwords or poorly managed credentials can still make this method vulnerable. Use a password manager to store complex passwords securely.
This method is best suited for:
– Protection from casual intruders accessing documents
– Protecting documents for personal use
– Internal business files that don’t require high-level encryption
– When combined with some advanced protection method
Here’s how to password protect a document in Microsoft Word / Excel / PowerPoint:
- Open the document.
- Go to File > Info > Protect Document > Encrypt with Password.
- Enter and confirm a strong password.
- Close and reopen the file to check the working
And while saving a document as a PDF:
- Click File > Save As > This device.
- Enter the file name and switch the save type to PDF.
- Click Options (bottom right corner).
- Check the ‘Encrypt the document with a password’ option.
- Enter and confirm the password.
- Note: Google Docs, Sheets, and Slides do not have a built-in password protection option. Instead, use access restrictions (see next section).
b. Restricting editing & copying
This includes managing user permissions controls how a document can be accessed or modified. This ensures recipients can view the document but can only copy, modify, or print it with explicit permission.
Useful in cases where:
– Documents shared with external parties but not meant for modification
– Files distributed to multiple parties with different control levels
– Preventing plagiarism or unauthorized distribution of documents
Here are the steps to restrict editing and copying:
Microsoft Word:
- Click Review > Restrict Editing
- Configure restriction settings (e.g., read-only, no copying)
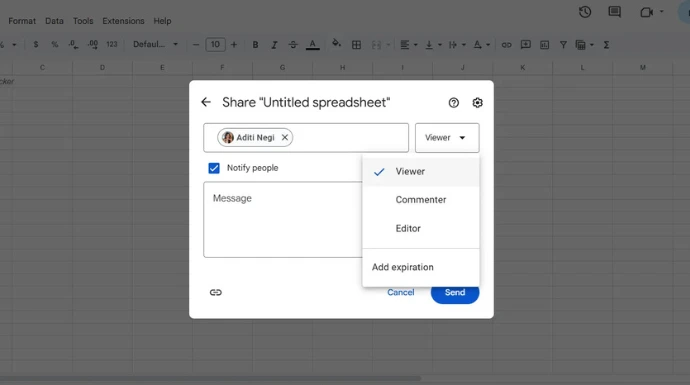
Google Docs:
- Click Share > Change permissions to Viewer or Commenter.
- For extra security, disable the option “Viewers and commenters can see the option to download, print, and copy” if you want to prevent unauthorized duplication.
c. Watermark
A watermark is an embedded visible or hidden text, logo, or design in a document to show ownership and authenticity.
It usually appears under the text in a semi-transparent form, ensuring readability while marking the document. An invisible watermark, on the other hand, keeps the content clean but embeds tracking data, making it traceable even if someone removes visible marks.
Especially beneficial for:
– Official documents like invoices, contracts, and certificates
– Preventing plagiarism or unauthorized sharing of reports and presentations
– Protecting creative content such as research papers, designs, and photographs
This is how you can insert a watermark:
For Microsoft Word Documents
- Open the Word document you want to secure.
- Click “Design” > “Watermark” (or “Page Layout” in earlier versions).
- Enter text (such as “Confidential” or company name) or upload a logo.
- Modify size, transparency, and position.
- Save as a PDF to avoid easy deletion.
For Google Docs
- Open the Google doc
- Click “Insert” > Go to “Watermark”
- Upload an image or insert text
- Customize transparency, size, and position according to your needs.
- Click “File” > “Download” and save it as a PDF.
d. Secure cloud storage
Securing documents on cloud storage ensures the data is secured on an off-site location. This makes it safe from accidental deletion, device failure, or local unauthorized access. However, it’s important to note that this refers to Google Drive, which is a public cloud storage service.
Best suited for instances where:
– Collaborative work environments
– Accessing files securely from multiple devices
– Securing files from mishandling, accidental deletion, and corrupted systems.
Here’s how to apply it
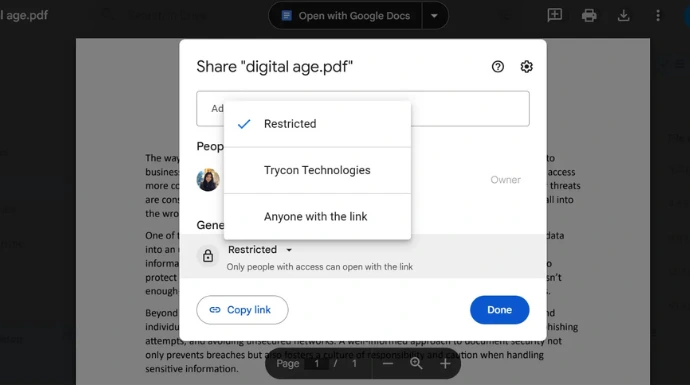
- Open Google Drive
- Click “New” > “File upload”, then select your document.
- Right-click the uploaded file and select “Share”.
- Under “General access”, choose “Restricted” (so only selected people can view it).
- Enter the emails of authorized users and set their roles as viewer, commenter or editor.
2. Advanced Protection Methods
These techniques are used for protecting more sensitive and confidential documents. These when lost can lead to heavy financial and legal consequences.
a. QR Code
QR Codes can help protect documents from being altered and prevent fraud. Placing a QR Code on a document allows verification by scanning, which displays document details on a secure page (explained in detail in Section C).
Some QR Codes even link to blockchain records, ensuring an unchangeable document history.
Commonly used for:
– Securing both digital and physical documents
– Maintaining the legitimacy of operational and official business documents
– Public-facing documents to prevent fraud
– Validating certifications and licenses
Here’s how:
- Choose a reliable provider such as QR Mark.
- Log in and upload the document.
- Enter document details for verification.
- Generate a QR Code and place it on the document.
- Save and download the finalized document.

b. Encryption
Encryption converts a document or file into an unreadable format that can only be accessed with the correct decryption key.
It can range from basic methods, like Encrypting File System (EFS) on Windows, to advanced cloud encryption, where third-party tools encrypt files before uploading them to a server.
Commonly implemented to:
– Protecting confidential business files, financial records, and legal documents.
– Securing personal data such as identification documents and contracts.
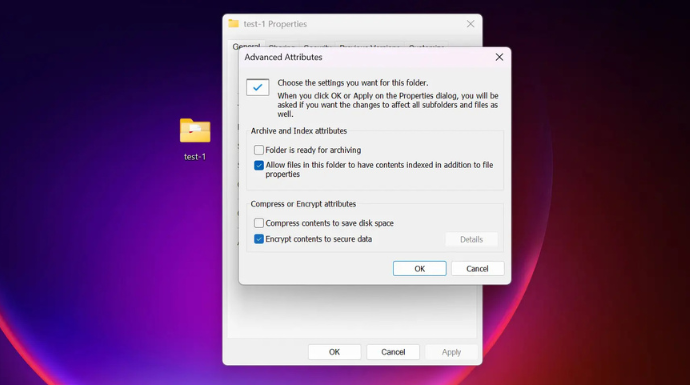
Here’s how to encrypt using Encrypting File System (EFS):
- EFS is a built-in Windows feature that allows you to encrypt files so only your user account can access them.
- Right-click on the file or folder you want to encrypt.
- Click “Properties”, then go to the “General” tab.
- Click “Advanced” under the “Attributes” section.
- Check the box for “Encrypt contents to secure data”, then click “OK”.
- Click “Apply”, then choose whether to encrypt just the file or the entire folder.
- Windows will prompt you to back up your encryption key. Follow the instructions to save it in a secure location in case you need to access the file from another device.
c. Digital signature
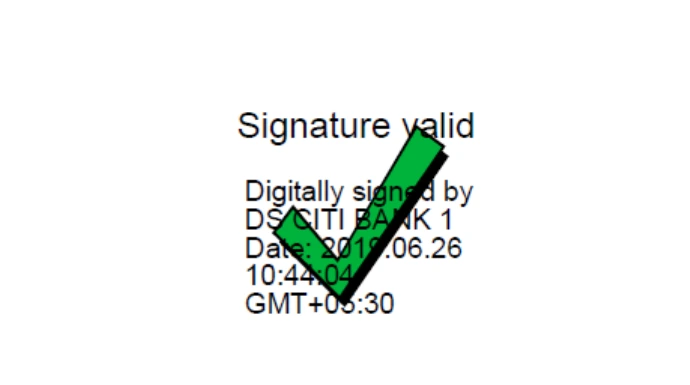
Image credit: community.adobe.com
People often mistake digital signatures for electronic signatures, but they serve different purposes. Digital signatures not only verify ownership but also detect any alterations made to the document after signing. If changes occur, the signature becomes invalid for the recipient.
Did you know? A Digital Certificate from a trusted Certificate Authority (CA) (such as Adobe Approved Trust List, GlobalSign, or DigiCert) is required to create a valid digital signature.
Preferred when handling:
– Preventing forgery and tampering of contracts, agreements, and legal documents.
– Any document that requires verification of the sender’s identity and document integrity.
Here’s how to apply it:
- Open Adobe Acrobat Reader DC (free) or Acrobat Pro DC (paid).
- Open your PDF (File > Open).
- Go to Tools > Certificates.
- Click Digitally Sign and draw a signature box.
- Select an existing Digital ID or create a New Digital ID. To create a new one, import a trusted certificate and set a password (if needed).
- Click Sign and save the document.
C. How to protect a document using QR Codes
QR Codes have emerged as a reliable way to verify document authenticity and prevent fraud.
Organizations need to protect both internal files and documents issued to the public, such as certificates, invoices, warranty cards, contracts, client records, medical reports, and insurance documents.
Did you know? You don’t need to install any additional app to scan and validate a QR verification image generated by QR Mark.
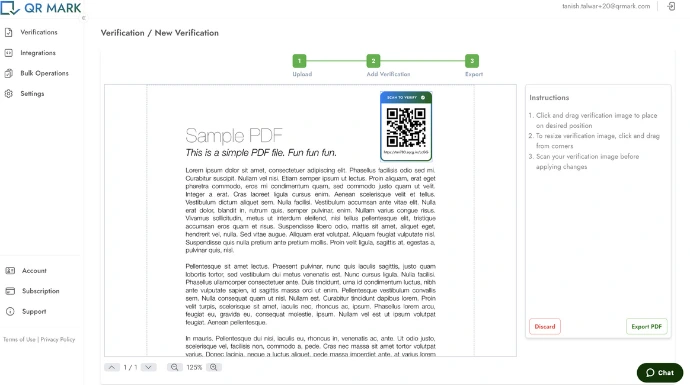
Here’s how to embed a QR verification image on your documents:
1. Go to qrmark.com and log in (or sign up if new).
2. Set up a custom domain under “Settings” to link documents to your verified subdomain.
3. Go to “Verification” > “Create Verification”, or install the add-ons under “Integration” to generate verification images directly within Google or Microsoft document editors.
4. Upload your PDF document from your device, Google Drive, or Dropbox.
5. Select your custom domain (useful if you manage multiple brands requiring protected documents).
6. Enter the document name and choose which page to place the verification image on.
7. Click “Generate Verification Image” and a unique QR verification image with a branded link will be created.
8. Adjust the size and position, then click “Export PDF.”
That’s it! Your document is now protected.
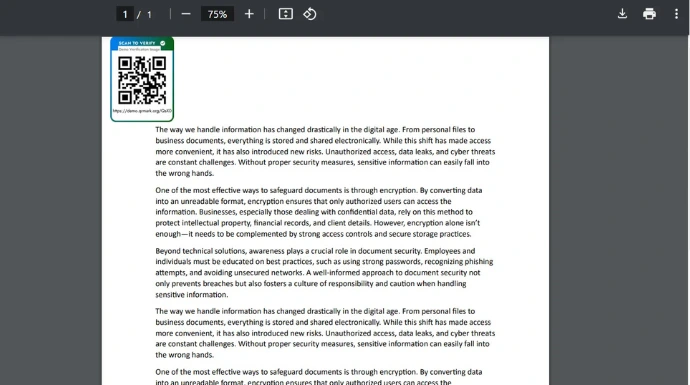
When scanned, the QR verification image will lead to a verified page displaying the document’s name, owner, creation date, and unique code. The attached original document will also be available for verification.

D. Proven best practices for document protection
1. Use multiple protection methods
Relying on a single security measure is risky. Layering makes document security more robust and difficult to circumvent.
For instance, using password protection accompanied by a QR verification image guarantees even if an individual acquires access to a document, they are unable to reproduce its authenticity.
2. Avoid public Wi-Fi for document transfers
Public Wi-Fi connections are not secure and open to hacking via packet sniffing and man-in-the-middle attacks. Work only from a secure, private network.
If remote work is required, have the network be password-protected and utilize cloud platforms for the transfer of documents rather than email.
3. Implement zero trust security
The “Never trust, always verify” approach assumes that even users within a network need authentication.
Role-based access control (RBAC) ensures employees only access documents relevant to their roles, reducing the risk of unauthorized access.
4. Establish a document protection policy
A clear, organization-wide policy ensures consistency and accountability in document security. It should define:
– Security levels required for different types of documents
– A classification system to categorize documents by importance
– Rules for document sharing and access control
– Password and encryption standards
– Employee training is equally crucial to prevent accidental mishandling of sensitive files.
FAQs:
1. Are there any additional security measures I can take beyond password protection?
Yes. Layering measures to strengthen document protection is always a good technique. You can use encryption to secure the document’s content, QR verification to verify authenticity, watermarking to deter unauthorized use, and access control settings to limit who can view or edit it.
2. How to protect a file or document from being edited?
You can avoid unwanted changes by limiting editing permissions:
- Microsoft Word: Activate “Read-Only” mode or limit editing to certain changes.
- Google Docs: Grant “Viewer” or “Commenter” access rather than “Editor.”
- PDFs: Utilize software such as Adobe Acrobat to password-lock editing.
3. How do I protect a document from being copied?
- Microsoft Word: Open the document > Go to Review > Protect > Restrict Editing > Under Editing Restrictions, choose No changes (Read-only).
- Google Docs: Open document > Click “Share” > Choose or add users > Click the gear/settings icon and de-select “Viewers and commenters can see the option to download, print, and copy.”
Conclusion & next steps
Your question, “How to protect a document,” should now be answered. Relying solely on password protection isn’t enough.
Assess the sensitivity of your documents and apply the right security methods accordingly. Have thoughts? Drop a comment below.