

TL;DR
Excel and Google Sheets are easy to edit, copy, or rebuild. This makes them a major target for document fraud. Password protection, locked cells, and PDFs only guard access. They do not protect authenticity once shared. Manual checks, signatures, and email trails often fail to confirm Excel document authenticity. Industries like finance, HR, education, compliance, and manufacturing face the most risk. QR Code document verification adds tamper checks, traceability, and real-time authenticity. If you want your Excel file to stay real and unchanged, this guide will help you protect it.
In 2026, Excel spreadsheets are among the easiest files to edit, copy, or fake. This puts your credibility at risk. That is why organisations now look for better ways to secure their key documents.
In this guide, you will learn what protecting Excel means and how to keep your files safe and trusted.
Alright, here we go!
What does “Protecting Excel” mean in 2026?
Protecting Excel means stopping unauthorized edits and proving the file is original. It uses passwords, editing limits, and verification tools to keep documents authentic.
Here are the four things people mean when they say they want to protect an Excel file:
- Access control — stopping unauthorised users from opening the file at all (file password)
- Edit prevention — stopping users from changing specific cells, formulas, or sheets
- Structure protection — preventing users from adding, deleting, or renaming worksheets
- Integrity verification — ensuring the recipient can confirm the file hasn’t been altered after you shared it
Why Should You Protect Your Excel Sheets?
The obvious answer is to prevent errors. Someone accidentally deletes a formula row, or overwrites a value that was supposed to stay fixed. That happens all the time in shared workbooks.
But the less obvious reason is more serious.
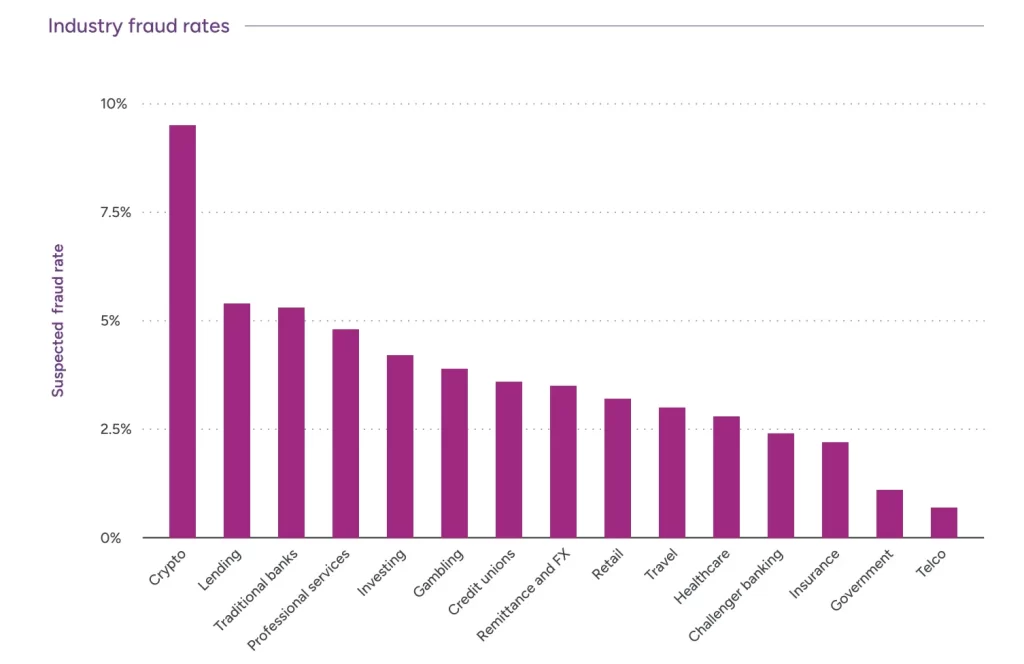
According to the Association of Certified Fraud Examiners (ACFE) 2024 Report to the Nations, document manipulation is involved in roughly 27% of asset misappropriation cases.
Financial statements, payroll files, and budget reports shared as Excel files are among the most commonly altered documents in business fraud.
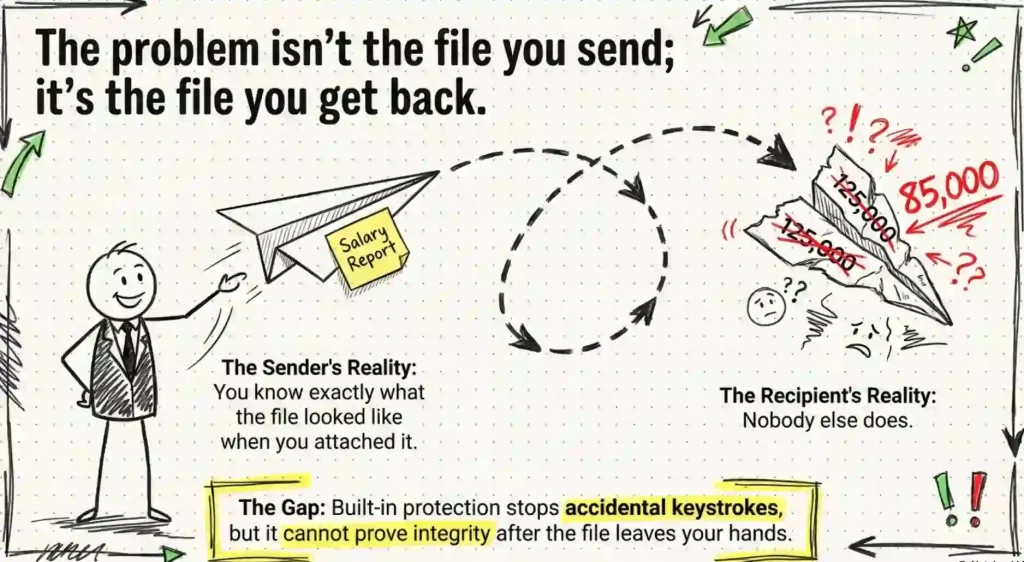
If you share a salary sheet with a payroll vendor, a budget workbook with an auditor, or a pricing model with a client, you’re not just at risk of accidental edits.
You’re at risk of intentional ones. And once the file leaves your inbox, you have no way of knowing what happened to it unless you’ve built in a way to verify its integrity.
The stakes are different depending on the file. An internal planning document is lower risk. A compliance report going to a regulator, or a data export going to an external auditor, is high risk. The right protection level depends on where the file is going.
What Are the Current Methods to Protect an Excel Sheet?
There are five distinct approaches. I’ll go through each one honestly, including what it does well and where it breaks down.
1. Excel Workbook Structure Protection
This locks the structural layout of your workbook. With it enabled, users can’t add new sheets, delete existing ones, move or rename tabs, or hide/unhide worksheets.
To turn it on: go to Review > Protect Workbook, set a password, and click OK. The password is optional but strongly recommended.
This is useful when you have a multi-tab workbook where the tab structure is important. Reporting templates where someone might try to add a “working” sheet, for example. It doesn’t stop anyone from editing data within existing sheets.
2. Excel Worksheet Protection
This is the most commonly used Excel protection method. When you protect a sheet, you lock it so users can’t edit cells unless those cells were explicitly unlocked before you enabled protection.
The default is that all cells are ‘locked’ in their formatting, but the lock only takes effect once you enable sheet protection. So the workflow is:
- Select the cells you want users to be able to edit.
- Right-click > Format Cells > Protection > uncheck ‘Locked’.
- Go to Review > Protect Sheet.
- Set a password and choose which actions users can perform (select cells, sort, use AutoFilter, etc.).
This answers the question a lot of people search for: can you lock specific cells in Excel without protecting the whole sheet? The short answer is no. The lock formatting on individual cells only activates when sheet protection is on. You can’t protect some cells while leaving the sheet completely unprotected.
What you can do is protect the sheet but unlock most cells, so users can edit freely except in the specific cells you’ve locked. That’s the practical workaround.
Similarly, if you want to protect formulas, you lock the formula cells and unlock everything else before enabling protection. If you want to protect columns, same approach: lock those column cells, unlock the rest, then protect the sheet.
3. Password Protecting an Excel File
To password protect your excel file, follow these steps:
File > Info > Protect Workbook > Encrypt with Password. Set your password and save.
A file-level password prevents anyone without the password from opening the file at all. This is different from worksheet protection, which lets people open the file but restricts what they can do.
Some people also ask how to lock an Excel file on save or on closing. Excel doesn’t have a native ‘auto-lock on close’ feature. What you can do is set a password so the file prompts for it on every open. That effectively locks it whenever it’s closed.
The limitation here is distribution. If you send a password-protected file to ten people, you need to share the password securely with all ten of them. The moment someone forwards the file and shares the password, your access control is gone.
4. Advanced Protection and Cloud Security
If you’re working within Microsoft 365, you have additional options: sensitivity labels, information rights management (IRM), and sharing permissions through OneDrive or SharePoint.
Sensitivity labels let you mark a file as Confidential and apply automatic protection rules. IRM lets you restrict what recipients can do with the file even after they’ve downloaded it. SharePoint and OneDrive permissions let you control who can view and edit a shared file, with full audit trails.
These are strong controls for internal collaboration within a managed environment. They work well when everyone is in the same Microsoft 365 tenant. They break down when files need to go to people outside your organisation who don’t have compatible software or licensing.
5. QR Codes
This is the protection method that handles what all the others miss: confirming that a file’s data hasn’t been altered after it left your hands.
A QR Code based verification approach works differently from the methods above. Instead of restricting what someone can do with a file, it gives the recipient a way to check whether the data they received matches what was originally issued.

6. Digital Signatures
A digital signature applies a cryptographic seal to a file. If anything changes after signing, the signature becomes invalid and the recipient is warned.
Excel supports digital signatures natively. You can add one via File > Info > Protect Workbook > Add a Digital Signature. You need a digital certificate from a certificate authority for this to be meaningful.
The limitation: the signature only works if the recipient’s software validates it and if they know to check. Most people receiving an Excel file don’t look for a digital signature. It’s also tied to the file format. Converting to a different format, or just exporting data to another tool, loses the signature.
| Method | Prevents Editing | Restricts Access | Protects Post-Share Integrity | Works Outside Your Org | Key Limitation |
|---|---|---|---|---|---|
| Worksheet Protection | Yes (locked cells) | No | No | Yes | Anyone can make a copy with no protection |
| Workbook Structure Protection | Partial (structure only) | No | No | Yes | Doesn’t lock cell data |
| File Password | No | Yes | No | Yes (if password shared) | Password sharing undermines control |
| Microsoft 365 / Cloud | Yes (via IRM) | Yes | Partial (audit trail) | Limited (requires M365) | Breaks when file is downloaded externally |
| Digital Signatures | Detects post-sign changes | No | Yes (if checked) | Yes | Recipients rarely verify; lost on format conversion |
| QR Verification Layer | No | No | Yes | Yes | Requires the issuer to set it up; protects exported outputs, not live files |
How Do QR Codes Help in Protecting Excel Sheets?
Let me be precise about this, because it’s easy to misunderstand. A QR Code doesn’t protect the Excel file itself. It doesn’t stop someone from editing cells or copying the workbook.
What it does is protect the integrity of the data after it has been shared. This matters when your Excel data gets exported or presented to someone outside your team.
Think about the most common scenarios. You run payroll in Excel and export a salary breakdown as a PDF to share with a department head. You build a pricing model and send it to a client. You prepare a compliance data report for an external auditor. In each case, the risk isn’t inside Excel — it’s what happens to the output once it leaves you.
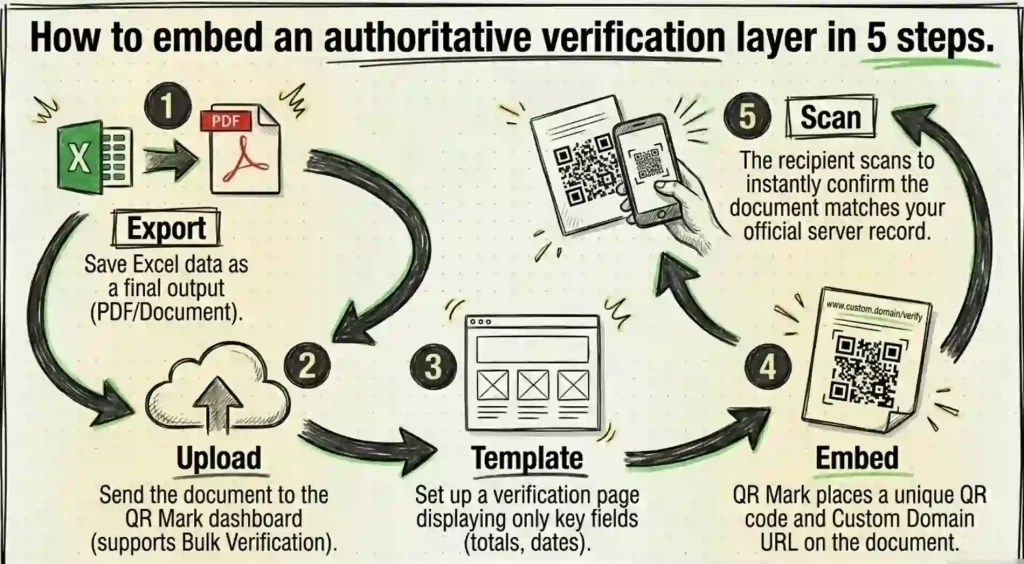
A QR Code based document verification system works like this: when you finalise and issue the document, you create a verification record tied to the key data points. That record sits on a server at a URL you control. You embed a QR code in the document. When the recipient scans it, they see the official values you issued. If someone altered the document before the recipient got to it, the mismatch is visible immediately.
Researchers at Springer have noted that QR Code based authentication on documents provides a lightweight but effective mechanism for post-issuance integrity verification, particularly for documents that move through multiple hands or are verified by parties without technical access to source systems.
QR Code Verification vs Password Protection: Which Should You Use?
These two approaches solve different problems. You’re not choosing between them; you’re choosing which combination makes sense for your situation.
Password protection is the right tool when you want to control who can open or edit the file. It’s access management. Use it for internal files that shouldn’t be opened by everyone, or for files sent to specific recipients who need the password to read the contents.
QR Code verification is the right tool when the file (or its output) is going to external parties and you need to protect against tampering or unofficial versions. It doesn’t lock the file. It creates an authoritative version that anyone can check against.
The gap password protection can’t fill: once you share a file and the recipient has the password, you can’t know if they changed the data and forwarded a modified version. The gap QR verification can’t fill: it doesn’t stop someone from opening or copying the original file without permission.
For high-stakes documents that travel externally, the right answer is both.
How do you add a QR Code to authenticate your Excel files?
If your team searches for “Excel QR Code generator,” QR Mark solves this use case. It helps you confirm the authenticity of any document using QR Codes.
Here is a simple step-by-step guide.
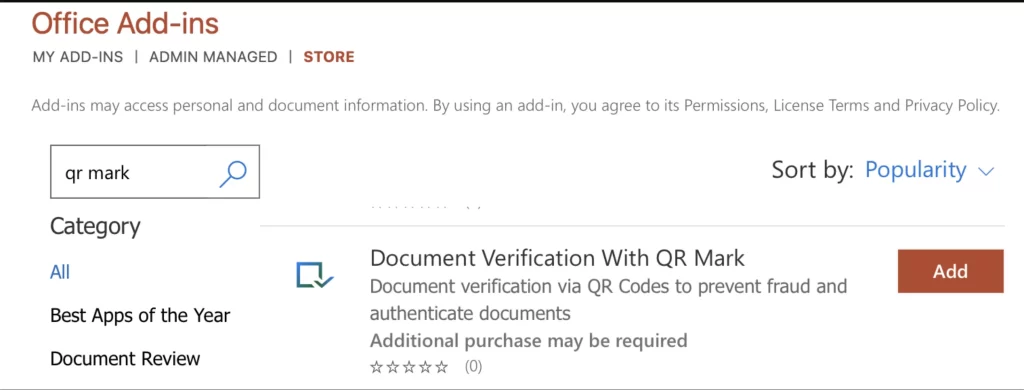
Step 1: Install QR Mark in MS Excel
- Open Excel (web or desktop).
- Insert → Add-ins → Get Add-ins Search for QR Mark and install it.
Pro tip: Install it once with your work account to use it across Word, Excel, and PowerPoint.
Step 2: Open the QR Mark Sidebar
- Open QR Mark from the Home or Insert tab.
- Sign in or create a new account.
Pro tip: Use your work email to keep the same verification process across your team.
Step 3: Set Up Your Verification Domain
- In the sidebar, open the domain area.
- Add your custom domain (like verify.yourcompany.com). You can also use the demo domain for testing.

Feature Insight: A custom domain lets you prove the document came from you and not a fake source.
Step 4: Link Your Sheet as the “Master” File
- Upload or save your Excel file to OneDrive.
- Click Share → Copy Link → Paste it in QR Mark.
- Name the document clearly (Example: Q4_Bonus_Calculation_2025).
Pro tip: Always link the master version your team controls.
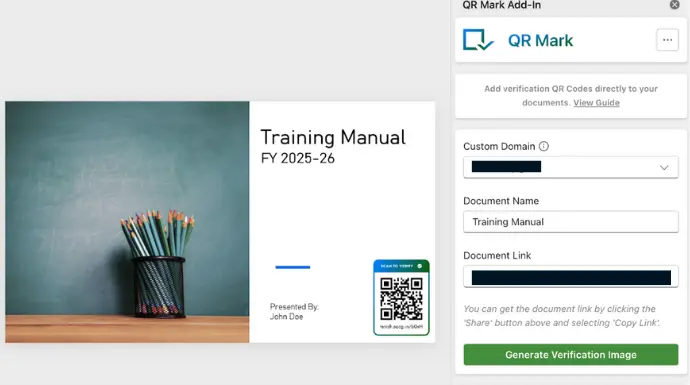
Step 5: Generate and Place the Verification QR Code
- After entering all the information, Click on Generation Verification Image
- After the QR Code is generated, you are free to choose where you want to place the QR Code.
Note: Place the generated QR Code in bottom right or top left
Pro tip: Use a fixed spot so reviewers know where to scan.
Feature Insight: QR Mark templates let you choose what appears on the verification page. You can add details that only you know. This makes tampering very hard.
Step 6: Save, Share, and Verify
Share it as:
- Excel file
- Printed copy
Recipients can scan the QR Code to check authenticity.
And Voila! Your document is now tamper-free.
Which industries face the most Excel tampering in 2026?
Excel and Google Sheets are easy to edit, copy, and rebuild. That is why some industries face higher risks of fake documents. These risks often involve lost trust, compliance failures, and fraud. Below are the sectors most affected and why authenticity matters.
- Higher Education & Training
Schools and universities use Excel for marks, transcripts, and certificates. These documents are often forged or edited. Even one fake certificate can hurt the institution’s reputation.
- HR & Hiring Teams
HR teams receive payslips and experience documents every day. HRs create many of these documents in Excel. These are also among the most faked documents in hiring.
- Finance & Payroll
Finance teams rely on Excel for invoices, payroll, budgets, and reports. A changed number or formula can cause big financial losses and compliance issues.
- Legal, Compliance & Audit
These teams must prove the accuracy of every document they handle. If someone edits an Excel sheet, they have no easy way to show the original version.
These risks do not only affect these specific sectors. Any organisations that depends on spreadsheets must protect their Excel sheets. These issues create real business risks. This in-turn affects trust, compliance, finances, and day-to-day operations.
4 Ways Forged Excel Document can Impact Your Business
Digital document fraud is growing. These fake files create legal, financial, and operational risks.
1. It weakens trust in your documents
A fake or edited file can make people question your whole process. It damages Excel document authenticity. Even one forged document can hurt your credibility.
2. It creates legal and compliance risks
Many teams must protect documents for audits, hiring, certifications, or reporting. When someone tampers with an Excel sheet, you cannot prove the original version. This leads to compliance issues.
3. It increases manual workload
Without reliable document verification, your team must check files by hand. That means slower processes, more mistakes, and less time for important tasks.
4. It can cause financial loss
Edited payslips, invoices, or reports can lead to real monetary damage. Excel has no built-in tamper detection, so fraud often goes unnoticed.
QR Code based document authentication reduces these risks by ensuring Excel document authenticity.
Where to Start With Excel Protection
The protection method you need depends on where your file is going and what risk you’re managing.
For internal files: worksheet protection and file passwords are your baseline. Lock the cells that shouldn’t be changed, protect the sheet structure if the layout matters, and set a file password for anything sensitive.
For files going to external parties: the above still applies, but you also need to think about what happens to the data after you send it. Password protection tells you nothing about whether the numbers were changed after the recipient opened the file. A verification layer does.
If you’re regularly sharing Excel-derived outputs with external stakeholders, financial reports, compliance summaries, pricing documents, QR Mark is worth setting up. The Custom Domain verification and Template-based pages let recipients confirm the key figures without you having to expose the full document.

FAQs
Can you lock Excel cells without protecting the sheet?
No. Cell locking in Excel only takes effect when sheet protection is enabled. You can mark cells as ‘locked’ in their format settings, but that formatting does nothing until you turn on Protect Sheet under the Review tab. The practical workaround is to unlock the cells you want users to edit freely, then protect the sheet.
How do you protect formulas in Excel without protecting the whole sheet?
You can’t selectively protect formulas without enabling sheet protection, but you can make the protection nearly invisible to users. Unlock all the non-formula cells (select them, right-click > Format Cells > Protection > uncheck Locked), then protect the sheet and allow users to select and edit unlocked cells. They’ll be able to work normally in data cells but won’t be able to touch your formulas.
How do you protect columns in Excel without protecting the sheet?
Same answer as formulas: column protection requires sheet protection to be active. Lock only the column cells you want protected, unlock everything else, then protect the sheet. Users can edit the unlocked areas normally.
How do you password protect an Excel file?
Go to File > Info > Protect Workbook > Encrypt with Password. Set a password and save. From that point on, anyone who tries to open the file will be prompted for the password before the content loads.
What is the difference between protecting an Excel workbook and protecting a worksheet?
Worksheet protection locks cell-level editing within a specific tab. Workbook protection locks the structural layout, meaning it prevents users from adding, deleting, or renaming sheets. They work independently, and you’ll often want both enabled at the same time.
How do QR codes protect Excel data?
QR codes don’t protect the Excel file itself. They protect the integrity of data that has been exported or shared from Excel. A QR-based verification tool like QR Mark creates a verification record when you issue a document. Recipients can scan the QR code and check that the data in their copy matches the official record, detecting any alterations made after issue.